How to install a loft ladder?
Installing a loft ladder is an excellent way to make accessing your loft easier and safer. Whether you're upgrading your current ladder or installing one for the first time, knowing how to install a loft ladder correctly is essential. This step-by-step guide will walk you through the process, covering everything from choosing the right type of loft ladder to fitting and maintenance.

Types of Loft Ladders and Choosing the Right One
Before you get started, it’s important to choose the right loft ladder for your needs. Each has its benefits:
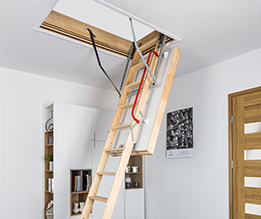
- Wooden loft ladders: These are traditional and often blend well with the decor of your home. They are a sturdy choice for those looking for a classic look.
- Metal loft ladders: A more durable option, offering a sleek, modern aesthetic and are ideal for more frequent use.
- Scissor loft ladders: These compact ladders fold into a small, neat package, ideal for spaces where storage is limited.
- Electrically operated loft ladders: A convenient, motorised operation, perfect for those with mobility issues or for frequent use.
- Fire-rated loft ladders: Designed to withstand heat, these ladders are essential for homes with fire safety regulations or higher safety standards.
- Energy-efficient loft ladders: Come with an insulated hatch, designed to reduce heat loss and improve the overall energy efficiency of your home.
- L-shaped loft ladders: Ideal for lofts with a tighter opening, offering a safe and easy way to access upper floors by changing direction halfway up the ladder.
Other features to consider include the hatch size, the eave door design, and any accessories that might improve safety and ease of use.
Preparing for Installation
Once you’ve selected your loft ladder, it’s time to prepare for the installation. Here’s what you’ll need:
- A hatch that is correctly sized for the ladder you’ve chosen
- Tools such as a drill, screwdriver, and measuring tape
- A helper (if required, depending on the ladder size)
- Safety equipment like goggles and gloves
Before starting the fitting process, clear the area around the loft hatch and ensure the surrounding space is safe and accessible. If the existing loft hatch needs replacing, this should be done first.
DIY vs. Professional Loft Ladder Installation
When it comes to DIY vs. professional loft ladder fitting services, it depends on your comfort level with home improvement tasks. If you’re confident with DIY and have the necessary tools, you might want to tackle the job yourself. However, if you’re unsure or if the ladder is a heavy-duty model, it’s always a good idea to hire a professional for loft ladder installation.
A professional fitter will ensure that the ladder is securely attached and complies with safety regulations, giving you peace of mind. On the other hand, if you choose to go the DIY route, our installation guide will walk you through each step of the process, ensuring a secure and safe fit.

Step-by-Step Guide to Loft Ladder Installation
Now that you’re ready, here’s a basic step-by-step guide on how to install a loft ladder:
- Prepare the loft hatch: Ensure that the hatch is the correct size for your ladder.
- Position the ladder: Depending on the type of loft ladder, position it at the hatch opening and ensure that the ladder fits securely within the opening.
- Install the ladder: Fix the ladder’s brackets or mounting hardware to the ceiling structure, making sure they are secure. If you’re using a telescopic or folding ladder, double-check that the mechanism works correctly.
- Check the hatch door: Once the ladder is in place, check the eave door or hatch cover to ensure it opens and closes smoothly without obstruction.
- Test the ladder: Carefully test the ladder’s stability by climbing it to ensure it is firmly fitted and that all locking mechanisms (if applicable) are working as they should.
For more detailed fitting instructions, visit our full installation guide for loft ladders.

Loft Ladder Maintenance and Safety Tips
Once your loft ladder is installed, it’s important to keep it maintained for longevity and safety. Regularly check for any wear and tear, including loose screws, rust, or wear on the steps or hatch. If you’ve chosen a ladder with accessories such as stabiliser bars or handrails, make sure they remain secure and intact.
Also, make sure the ladder is clear of any obstructions, and always use it on a level surface. If the ladder starts to feel unstable or wobbly, it may need to be re-secured or replaced.
Conclusion
Knowing how to install a loft ladder properly is key to ensuring safe and easy access to your loft. By following the step-by-step guide, you can install your loft ladder with confidence, whether you opt for a wooden loft ladder, metal loft ladder, or a more complex model with additional accessories.
Remember, if you’re unsure about the installation process, don’t hesitate to hire a professional for help. With the right installation and upkeep, your loft ladder will provide years of safe and reliable service.
Looking for the perfect loft ladder? At FAKRO, we’re committed to offering high-quality loft ladders designed to stand the test of time and ensure safe and easy access to your loft. To learn more about our products and accessories, visit our loft ladders page.


